Indian weddings are among the most photographically complex events in the world. Multiple days, multiple outfits, multiple venues, wildly different lighting conditions (from bright outdoor haldi to dim indoor phera), hundreds of guests with varying expectations, and rituals that move at their own unpredictable pace. The difference between a wedding album you display proudly and one that disappoints is rarely the photographer's equipment — it is the preparation, communication, and awareness that the couple brings to the process. After coordinating photography for hundreds of weddings across Bangalore, Goa, Kerala, and Bali, here is everything we tell our couples about getting photographs they will treasure. For venue-specific photography guidance, see our Goa photography locations guide and Kerala photography locations guide.
Before the Wedding: Preparation That Matters
Choosing Your Photographer
The single most important photography decision happens months before the wedding. Here is what actually matters when selecting a wedding photographer in India:
- Review full albums, not Instagram highlights. Every photographer can curate 20 stunning images. Ask to see 3 complete wedding galleries (300+ images each). Judge consistency, not peaks. How do the candid shots look? How are the group photos lit? Are the dark-venue images grainy or clean?
- Match style to preference. Wedding photography in India broadly falls into four styles: candid documentary (unposed, story-driven), editorial/fashion (posed, magazine-quality lighting), traditional (formal portraits, group photos), and cinematic (film-like composition and colour grading). Most photographers blend styles, but they lean toward one. Ensure their lean matches yours.
- Verify who actually shoots. Many photography studios assign different team members to different weddings. Confirm in your contract that the photographer whose work you reviewed is the one who will be at your wedding. This is the most common source of disappointment in Indian wedding photography.
- Check their experience with your format. A photographer who excels at North Indian weddings may not know the critical moments of a South Indian ceremony. A Goa beach wedding requires different skills than a Bangalore ballroom wedding. Ask specifically about their experience with your wedding style.
The Pre-Wedding Meeting
Schedule a dedicated 60–90 minute meeting with your photographer 3–4 weeks before the wedding. This is not a social call — it is a planning session. Cover the following:
- Share the complete schedule with exact timings for every function
- Walk through the venue layout (photos or a site visit) so the photographer can plan angles and lighting positions
- Discuss the shot list — the 15–20 must-have images (specific family groupings, specific ritual moments)
- Share Pinterest references for the aesthetic you want — but be open to the photographer's creative input
- Discuss outfit details — colours, fabrics, jewellery — so the photographer can plan backgrounds and lighting that complement rather than clash
- Identify key family members by face (share photos) so the photographer knows who to prioritise in candid coverage
- Discuss what you do NOT want — if you dislike heavy filters, dramatic editing, or certain poses, say so explicitly
The Shot List Rule
Keep your must-have shot list to 15–20 items maximum. These should be specific combinations ("bride with maternal grandmother", "couple with college friend group of 8") and specific moments ("the moment the groom first sees the bride in her ceremony outfit"). Everything beyond this list should be left to the photographer's creative judgment. An over-specified shot list turns your wedding day into a photo shoot rather than a celebration.
Engagement Photography Tips
The engagement ceremony — whether a formal ring exchange at a venue or an intimate family gathering at home — sets the tone for the entire wedding album. Here is how to maximise this event photographically.
- Ring exchange timing: Brief the photographer on exactly when the ring exchange will happen. This is the one moment that cannot be recaptured. The photographer needs to be in position before it happens, not scrambling to find an angle during the moment.
- Background matters: If possible, position the ring exchange against a clean, uncluttered background — not in front of a buffet table or with exit signs visible. Even shifting 2 metres can transform the frame.
- Lighting the ring: Small, reflective objects like rings are notoriously difficult to photograph. Ask your photographer to bring a macro lens or a close-up attachment. Natural sidelight (from a window) or a single off-camera flash creates the best ring detail shots.
- Candid couple time: Request 15–20 minutes of just the couple together after the formal ceremony for portrait shots. This is when the photographer captures the images that will actually hang on your wall — relaxed, genuine expressions rather than the polite smiles of a formal ceremony.
Mehendi Photography Tips
The mehendi is the most colourful, relaxed, and photogenic pre-wedding function. The challenge is capturing the detail and intimacy of mehendi application while also documenting the social energy of the gathering.
Mehendi Application Shots
- Position the bride near a window. Natural sidelight creates depth and brings out the wet mehendi's rich colour. If the mehendi is applied outdoors, a shaded area with indirect light is ideal — direct sun creates harsh shadows on the hands.
- Shoot the process, not just the result. The mehendi artist's hands at work, the bride's face in contemplation, her friends gathered around watching — these process images are often more emotionally resonant than the finished design.
- Detail shots: Once the mehendi is dry (30–40 minutes after application), photograph the hands against contrasting backgrounds — dark fabric, flower petals, or the bride's outfit. The dried mehendi (dark red-brown after paste removal) photographs differently from wet mehendi — plan time for both.
- Capture the group energy: The second photographer should cover the wider scene — friends getting mehendi done on their hands, family members laughing, children playing, food being served. These wide shots provide context for the album.
Decor and Detail Shots
Mehendi decor — often the most vibrant and playful of all wedding functions — deserves dedicated coverage. Brief your photographer to arrive 30 minutes before guests for detail shots: the seating arrangement, the colour palette, the food display, and any signage or photo installations. These images provide the album with visual breathing room between people shots.
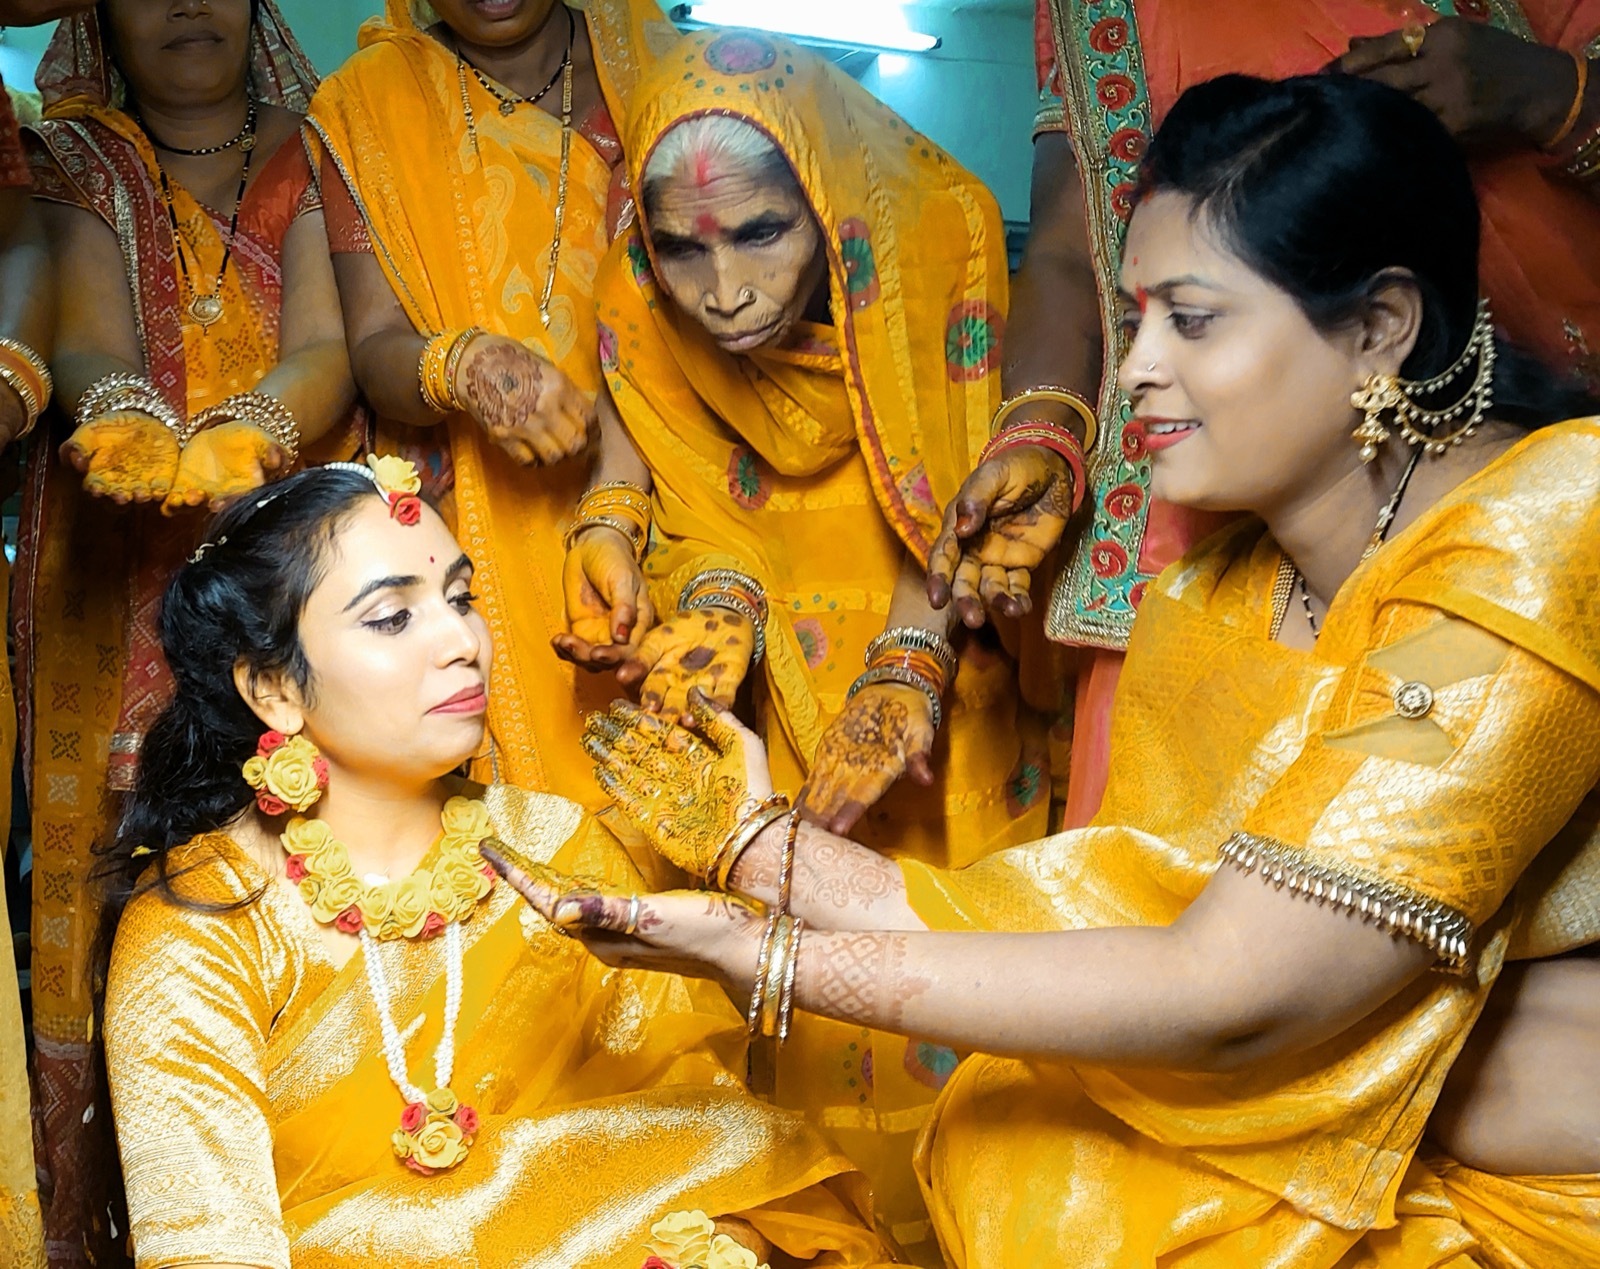
Haldi Photography Tips
The haldi ceremony is pure, unscripted emotion — the most genuine laughter, the most spontaneous moments, and the messiest visual chaos of the entire wedding. It is a photographer's dream and nightmare simultaneously. Here is how to prepare.
- Protect the equipment. Turmeric paste will be flying. Your photographer must bring rain covers or plastic wraps for their camera bodies and lenses. A camera damaged during haldi is a real risk — we have seen it happen.
- Wardrobe for photography: Yellow and white outfits photograph best during haldi — they complement the turmeric's golden colour rather than clashing. Avoid dark colours — turmeric stains will be visible and distracting. The bride and groom should wear something they are comfortable getting stained in.
- Outdoor is always better. If possible, hold the haldi outdoors in open shade. The combination of natural light and the golden turmeric creates warm, saturated images that no amount of indoor lighting can replicate. If outdoors is not possible, position the ceremony near large windows.
- Anticipate the chaos: Brief the photographer on who will be applying the haldi — especially enthusiastic friends who might turn it into a turmeric fight. The photographer should position themselves slightly elevated (standing on a step or stool) to capture the overhead chaos without getting caught in it.
- Capture the before and after: Portraits before the haldi (clean, composed) and after (turmeric-covered, laughing, joyful) create a beautiful narrative sequence in the album.
Sangeet Photography Tips
The sangeet is the most technically demanding function for wedding photography because it involves rapid shifts between low-light dance floor conditions, bright stage lighting, dark ambient dining areas, and flash photography for candids — all within the same venue, within the same hour.
Stage Performance Coverage
- Coordinate with the lighting team. The photographer should speak with the lighting designer before the event to understand colour gels, spotlight positions, and any blackout moments. Knowing when the lights will change allows the photographer to adjust settings proactively rather than reactively.
- Position two shooters. One photographer at the front-centre capturing wide performance shots; one at 45 degrees capturing performer expressions and audience reactions simultaneously. If you have only one photographer, audience reaction shots are more valuable than technical performance coverage — guests can record the performances on their phones.
- Flash during performances is controversial. Discuss this with your photographer. Flash disrupts performers and creates flat, harsh images on stage. The best sangeet images use available stage lighting only — which requires a photographer comfortable shooting at high ISO with fast lenses (f/1.4–f/2.8). If your photographer insists on using flash during performances, it may indicate limited experience with event photography.
Candid Coverage
The sangeet's real photographic value is in the candid moments — families watching performances with pride, friends cheering from the crowd, the couple's reaction to a surprise act, elderly relatives dancing unexpectedly. The second photographer should be roaming the audience continuously, using a fast prime lens (85mm f/1.4 or 35mm f/1.4) to capture these moments with natural bokeh and minimal flash intrusion.
Wedding Ceremony Photography Tips
The ceremony is the emotional core of the wedding and presents the most significant photography challenges: rituals happen quickly, lighting is often poor (mandap canopies, fire smoke), the couple is seated and partially obscured, and family members crowd into the frame. Here is how to navigate it.
South Indian Hindu Ceremony
- Key moments to capture: Bride's entry (varan with kalash), kashi yatra (groom's mock departure), kanyadaan, tying of the thali/mangalsutra, exchange of garlands (malai maatral), saptapadi, and the couple's first look at each other after the rituals. Brief your photographer on the exact sequence — it varies by community.
- The thali/mangalsutra moment: This is the most important single photograph of a South Indian wedding. The photographer must be in position before it happens. Discuss with the priest exactly when this will occur and have the photographer positioned at eye level, directly in front of the couple.
- Fire and smoke management: The homam (sacred fire) creates beautiful warm light but also smoke that can obscure the couple. Position the photographer upwind of the fire. A second photographer on the opposite side provides a backup angle if smoke shifts.
North Indian Hindu Ceremony
- Key moments: Baraat (groom's procession), varmala (garland exchange), kanyadaan, sindoor application, saptapadi (seven steps around the fire), and vidaai (bride's departure).
- The baraat: This is a moving event — the photographer needs to be mobile, shooting both the groom's energy and the guests' celebration. A wide-angle lens (24mm or 35mm) captures the crowd energy; a telephoto (85mm or 135mm) captures the groom's expression amid the chaos. Drone footage of the baraat procession, if legally permissible at the venue, creates spectacular wide shots.
- Varmala timing: The garland exchange often involves playful competition (each side lifting the bride/groom to make it harder). The photographer needs continuous burst mode — the perfect moment lasts less than a second.
- Vidaai: The most emotional moment of any Indian wedding. The photographer should be positioned to capture both the bride's face and her parents' expressions simultaneously. A two-camera setup is essential here — one on the bride, one on the parents.
Christian & Muslim Ceremonies
- Church weddings: Many churches restrict photographer movement during the ceremony — confirm rules in advance. Flash may be prohibited. Your photographer needs fast lenses (f/1.4) and high-ISO capability. The walk down the aisle is the signature shot — position the photographer at the altar end with a clear sight line to the entrance.
- Muslim weddings (Nikah): The signing of the nikahnama is the key documentary moment. The photographer should be positioned to capture the bride's face (mehendi on hands visible), the groom signing, and the qazi officiating. The Walima reception follows traditional reception photography principles.
Reception Photography Tips
The reception is the most structured and predictable event photographically — which makes it the easiest to optimise with advance planning.
The Couple's Entrance
The reception entrance is your second opportunity (after the ceremony) for a dramatic, high-impact image. Coordinate with your planner on the entrance route, lighting, and timing. The photographer should be positioned at the end of the aisle or pathway, capturing the couple walking toward the camera with backlighting or spotlights creating rim light on the outfits. Smoke machines, sparklers, or confetti provide visual texture but must be coordinated with the photographer in advance — they affect exposure and autofocus.
Stage Portraits
The reception stage is where 80% of the group portraits happen. Photography-friendly stage design matters enormously:
- Background colour: A mid-tone background (not too dark, not too bright) with texture or depth photographs best. Pure white backgrounds blow out; pure dark backgrounds create contrast issues with Indian skin tones.
- Lighting: The stage must have dedicated, consistent lighting — not just the venue's ambient wash. Two soft boxes at 45 degrees from either side of the stage, plus a fill light from the front, create professional studio-quality light for every group photo without needing flash. Cost: ₹15,000–₹30,000 for dedicated stage lighting setup. This is the highest-ROI photography investment you can make.
- Group photo efficiency: With 200+ guests wanting stage photos, you have roughly 30 seconds per group. Brief a family member to manage the queue and call out specific combinations ("maternal uncles and aunts, please"). Your photographer cannot manage the queue and shoot simultaneously.
Dinner and Candid Coverage
Once the formal stage program ends, the photographer shifts to candid coverage of dinner, dancing, and conversation. This is where the second photographer earns their fee — roaming through the dining area and dance floor, capturing genuine moments. Brief them on specific moments you want: the cake cutting, the first dance (if applicable), toasts, and any surprise elements. The lead photographer should stay with the couple throughout for spontaneous moments and portrait opportunities.
Lighting Tips That Transform Your Photos
Lighting is the single biggest determinant of photography quality — more than the camera, more than the lens, more than the photographer's editing skills. Here are the lighting principles that apply across every function.
- Golden hour is non-negotiable. If your ceremony timeline allows it, carve out 20 minutes during golden hour (the hour before sunset) for couple portraits. This window produces the most universally flattering light available. Schedule it with your planner — it requires leaving the event for 20 minutes, but the images will be worth it.
- Avoid mixed lighting. The most common lighting problem at Indian weddings: venue LED lights (cool blue), decorative fairy lights (warm amber), and photographer flash (neutral white) all hitting the subject simultaneously. The result is skin that looks different colours from different angles. Solution: ask your lighting designer to use a consistent colour temperature across the key photography zones (stage, couple portrait area, entrance).
- Window light for getting-ready photos. The getting-ready session is the most photographically beautiful when shot near a large window with sheer curtains. Position the bride's makeup station perpendicular to a window — the sidelight creates dimensional, flattering portraits with natural shadows.
- Avoid direct flash on dark skin tones. Direct on-camera flash creates a flat, washed-out look on medium-to-dark Indian skin tones. Your photographer should bounce flash off a ceiling or wall, or use off-camera flash with a softbox. If they are shooting with direct flash throughout the wedding, it indicates a technique limitation.
Pose Ideas That Actually Work
The best wedding photos are not heavily posed — they are lightly directed. Your photographer should give you an action ("walk toward me slowly", "whisper something that makes her laugh", "look at each other") rather than a fixed position ("put your hand here, tilt your chin 15 degrees"). Actions create genuine expressions; positions create stiffness.
- The walking shot: Walk toward the camera slowly, looking at each other. This creates natural body movement, genuine expressions, and a dynamic composition. It works in any outfit, at any location, in any light.
- The forehead touch: Foreheads gently touching, eyes closed, both smiling softly. This creates an intimate, tender image that works as a standalone portrait or an album cover.
- The look-back: The couple walks away from the camera; the bride looks back over her shoulder. This creates a dramatic, fashion-editorial composition that showcases the outfit and jewellery from behind.
- The lifted veil: The groom lifting or adjusting the bride's dupatta or veil creates a naturally tender moment. Brief the photographer to capture this gesture — it often happens spontaneously but the photographer needs to be ready.
- The family candid: Rather than stiff, posed family portraits, ask the photographer to capture a moment of genuine interaction — parents blessing the couple, siblings laughing together, grandparents watching the ceremony. These images have more emotional value than any formal group photo.
What to Tell Your Photographer
Clear communication prevents 90% of photography disappointments. Here are the specific conversations to have:
- "Here are the 5 images I care about most." Not 50 — five. The couple's first look, the thali tying, the parents' emotion during vidaai, the reception entrance, and one specific family combination. If the photographer nails these five, the rest of the album will follow.
- "Here is the ceremony sequence." Print the ritual order with approximate timings and give it to the photographer. Mark the moments that are most important photographically. This prevents the photographer from missing the thali tying because they were shooting the back of someone's head.
- "Please avoid these edits." If you do not want heavy skin smoothing, dramatic HDR effects, or oversaturated colours, say so before the contract is signed. Editing style is personal — but it must be agreed upon in advance, not debated during delivery.
- "Who is your backup?" What happens if the photographer is ill on your wedding day? A professional should have a named backup with comparable skills. This should be in the contract.
- "When do I receive the images?" Get specific timelines in writing: sneak peeks (48–72 hours), full gallery (6–10 weeks), and wedding film (8–12 weeks). Include these in the contract with a penalty clause for significant delays.
Budget Guide — Wedding Photography in India 2026
| Tier | Budget Range | What You Get |
|---|---|---|
| Essential | ₹50,000–₹1L | 1 photographer, 1–2 events, 200–300 edited images, no video |
| Standard | ₹1–2.5L | 2 photographers, all events, 400–600 images, pre-wedding shoot included |
| Premium | ₹2.5–5L | 2 photographers + videographer, all events, 500–800 images, cinematic highlight film, pre-wedding shoot, drone coverage |
| Luxury | ₹5–10L | Full crew (3 photographers, 2 videographers, drone), all events, 800+ images, full-length wedding film, same-day edit, pre-wedding shoot at destination, album design included |
| Destination Specialist | ₹8–15L | National or international photographer, full travel crew, all events, unlimited coverage, cinematic film, editorial album |
Investment Perspective
Photography is the only wedding investment that appreciates over time. Your venue, food, decor, and entertainment are consumed on the day. Your photographs are the only tangible artifact of the celebration that you will look at for decades. Budget accordingly — 6–10% of your total wedding budget is the recommended allocation for photography and videography combined.
Common Mistakes to Avoid
- Booking based on price alone. The cheapest photographer is the most expensive mistake. Poor wedding photography cannot be redone — the day is gone. Budget more and compromise on something replaceable (a food station, an extra flower arrangement).
- Not feeding the photography team. Your photographer is working 12–16 hours on your wedding day. Provide dedicated meals and water breaks. A dehydrated, hungry photographer at hour 14 produces measurably worse work than one who has been properly looked after. This is a small logistical detail that makes a significant quality difference.
- Uncle with a DSLR blocking the professional. Designate a family member to politely manage enthusiastic amateur photographers who stand in front of the hired professional during key moments. This is a real and common problem — discuss it with your planner and family in advance.
- No time carved out for couple portraits. If the wedding schedule runs non-stop from morning ceremony to evening reception with no break, the photographer gets zero opportunity for creative couple portraits. Build in 20–30 minutes specifically for photography — preferably during golden hour.
- Ignoring the second photographer's role. The lead photographer follows the couple; the second photographer captures everything else — getting ready, guest reactions, detail shots, venue atmosphere. If you are saving budget by using one photographer, you are losing 40% of the visual storytelling.
Frequently Asked Questions
How much should I budget for wedding photography in India in 2026?
Wedding photography ranges from ₹50,000–₹1L for basic coverage of 1–2 events to ₹5–15L for top-tier destination wedding specialists with a full crew. Most couples spending ₹25–50L on their wedding allocate ₹1.5–3L (6–8%) to photography and videography combined.
How many photographers do I need for my Indian wedding?
For a 200+ guest wedding with multiple events, a minimum of 2 photographers and 1 videographer. The lead covers the couple and key moments; the second covers candids, details, and guest reactions. For destination weddings or concurrent events, add a third photographer.
Should I create a wedding photography shot list?
Yes, but keep it to 15–20 must-have items — specific family groupings and specific moments. A 100-item list turns your photographer into a checklist executor. Share it 2 weeks before the wedding so the photographer can plan logistics.
How do I choose the right wedding photographer?
Review full wedding albums (not curated highlights), check their experience with your specific wedding format, meet in person, ask about their backup plan, and verify that the photographer you are reviewing will actually shoot your wedding.
What is the best lighting for Indian wedding photography?
Natural golden-hour light (6–8 AM or 4–6 PM) is ideal for outdoor ceremonies and portraits. For indoor events, professional off-camera flashes with diffusers are essential. Avoid direct overhead venue lighting for portraits.
How far in advance should I book my wedding photographer?
Book 10–14 months before for peak season (November–February). Top photographers accept only 25–35 weddings per year. For off-season weddings, 6–8 months is usually sufficient. Always sign a contract specifying the exact photographer and deliverables.
What should I wear for wedding photographs to look my best?
Avoid heavy mirror work near the face (creates reflections in flash). Rich solid colours photograph better than busy prints. Matte fabrics are more consistent than high-sheen materials. Choose jewellery that frames your face rather than overwhelming it.
How long does it take to receive wedding photos?
Standard timelines: sneak peeks within 48–72 hours, highlight video within 1–2 weeks, full edited gallery (300–800 images) within 6–10 weeks, and full wedding film within 8–12 weeks. Thorough culling and colour grading take time — rush jobs compromise quality.
Begin Your Story
Plan Your Wedding Photography
Tell us your wedding vision. We coordinate photographers who understand Indian weddings from the inside — every ritual, every moment, every emotion.
Start the Conversation